越狱
必备插件
- ifunbox 文件查看
- Apple File Conduit “2” 文件访问路径变成根目录,iOS9以后不支持
- AppSync Unified 绕过验证,APP安装的签名机制
- 解决iOS11上运行Xcode崩溃 dyld: could not load inserted library….
ios11上不可用viewDebug
- 安装openSSH插件
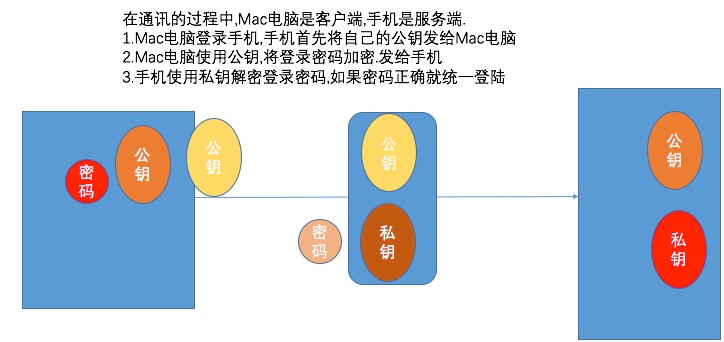
SSH
- SSH是一种网络协议.用于计算机之间的加密登录!
- openSSH其中一种运用协议的软件.
- SSH通讯过程
- 中间人攻击(Man-in-the-MiddleAttack,简称“MITM攻击”)
- 预防中间人攻击最有效的方法就是验证 公钥是不是服务器的!!
- 如果是公开的SSH服务器,一般会将公钥的哈希值 公布在网站上!!
通过openSSH连接(登录)手机
//ssh 用户名@用户服务器地址
$ ssh root@192.168.31.178
//退出
$ exit
//删除SSH服务器对应的公钥
$ ssh-keygen -R 服务器IP地址
iOS下有两个用户
-
root 最高权限的用户
$HOME:/var/root -
还有一个 mobile
$HOME: /var/mobile
修改ssh登录密码
- passwd 输入两次新密码
SSH使用公钥登录
- 除了使用密码登录,也可以免密码登录!所谓的”公钥登录”,原理:
1.Mac电脑将自己的公钥发给远程的手机 2.手机随机的生成一段字符串,发给Mac电脑. 3.Mac利用私钥加密字符串! 4.手机利用公钥解密字符串! 如果还要输入密码的话,设置文件的权限! chmod 755
//生成公私钥
$ ssh-keygen
Generating public/private rsa key pair.
Enter file in which to save the key (/Users/qionglinfu/.ssh/id_rsa):
/Users/qionglinfu/.ssh/id_rsa already exists.
Overwrite (y/n)? y
Enter passphrase (empty for no passphrase):
Enter same passphrase again:
Your identification has been saved in /Users/qionglinfu/.ssh/id_rsa.
Your public key has been saved in /Users/qionglinfu/.ssh/id_rsa.pub.
The key fingerprint is:
SHA256:9XIlN1AjWwcqmZo/lVlj0Dp5uMWeejkKLstiBbJkF6s qionglinfu@bogon
The key's randomart image is:
+---[RSA 2048]----+
|            +o=..|
|      .    o B.o |
|       o  = +=B  |
|    + +  + o=O+o |
|   o = .S . ** . |
|    E   .. +. o  |
|       .  +  . . |
|      o... o. +  |
|     . .oo. .o . |
+----[SHA256]-----+

$ ls
id_rsa//私钥
id_rsa.pub//公钥
known_hosts
known_hosts.old

//把公钥拷贝到服务器
$ ssh-copy-id root@172.17.10.121
/usr/bin/ssh-copy-id: INFO: Source of key(s) to be installed: "/Users/qionglinfu/.ssh/id_rsa.pub"
/usr/bin/ssh-copy-id: INFO: attempting to log in with the new key(s), to filter out any that are already installed
/usr/bin/ssh-copy-id: INFO: 1 key(s) remain to be installed -- if you are prompted now it is to install the new keys
root@172.17.10.121's password:

Number of key(s) added:        1

Now try logging into the machine, with:   "ssh 'root@172.17.10.121'"
and check to make sure that only the key(s) you wanted were added.

//再次登陆,无需密码
$ ssh root@172.17.10.121

//查看服务器公钥
$ cd ~/.ssh
$ ls
authorized_keys
$ cat authorized_keys

//or查看公钥
$ cd /etc/ssh/
$ cat ssh_host_rsa_key.pub
USB
- SSH的默认端口是22
- usbmuxd 在iOS和Mac上都是自带的!
- SSH通过USB走的话。需要做端口映射下载python-client,脚本的目的监听本机的12345端口,设置端口注意考虑占用问题
//设置转发端口$ python tcprelay.py -t 22:12345
Forwarding local port 12345 to remote port 22
//另开窗口,使用新端口登陆
ssh -p 12345 root@127.0.0.1
The authenticity of host '[127.0.0.1]:12345 ([127.0.0.1]:12345)' can't be established.
RSA key fingerprint is SHA256:pX3wqp3yEaLUk4S4lUJftC34FufQrx47Gc2e6Sm2t0U.
//IP更换重新认证
Are you sure you want to continue connecting (yes/no)? yes
Warning: Permanently added '[127.0.0.1]:12345' (RSA) to the list of known hosts.
kumani:~ root#
脚本实现快速登陆
-
HOME下新建文件夹QLshell
-
python-client拖进去
-
新建usbConnect.sh
//文件夹写入 python /Users/(路径)/QLshell/python-client/tcprelay.py -t 22:12345 -
新建login.sh
//文件夹写入 ssh root@localhost -p 12345 -
配置环境
//编辑bash_profile $ vim ~/.bash_profile //添加 export ANDROID_HOME=~/Library/Android/sdk export THEOS=/opt/theos/bin export CY=/opt/cycript_0 export QLshell=~/QLshell export PATH=$ANDROID_HOME/tools:$ANDROID_HOME/platform-tools:/opt/theos/bin:$CY:$QLshell:$PATH //编辑zshrc $ vim ~/.zshrc //添加 source .bash_profile //执行 $ source .zshrc//试一下咯? $ sh usbConnect.sh //另开窗口 $ sh login.sh //是不是美滋滋? -
同样IP,不一样的公钥,会出现中间人攻击,USB特效情况
-
解决方案
//key不一样。找到直接删除 $ vim /Users/(userName)/.ssh/known_hosts //删除它,跟你脚本一样的localhost~ [localhost]:12345 ssh-rsa - 本地不止保存一个公钥
- 本地一个IP:端口只能保存一个
文件拷贝
//通过Wi-Fi拷贝
$ touch 1.txt
$ scp 1.txt root@172.17.10.118:~/
1.txt                                         100%    0     0.0KB/s   00:00
//通过USB拷贝
$ scp -P 12345 1.txt root@localhost:~/
1.txt                                         100%    0     0.0KB/s   00:00
应用瘦身
lipo WeChat -thin arm64 -output arm64_WeChat